In the middle of all the rush and holiday cheer we are getting ready for
the baby shower of a friend of my oldest daughter. The theme is Dr.
Seuss. So I took a break from my regular scrapbooking and worked on a
shower umbrella. The umbrella itself is covered with rows of white eyelet sewn right onto the umbrella. Once you have that the umbrella can be used over and over again. Different flowers and ribbons are added to suit the occasion. For this shower I used primary colored ribbons. They are tied just under the first row of eyelet and hang down past the edge of the umbrella.
Then I used my Cricut to cut out a variety of primary colored ovals and circles (2-4 inches in diameter.) I glued pictures of various Dr. Seuss characters onto each side of the circles, punched holes at the top and tied one onto the end of each of the ribbons.
The last thing was to sew flowers onto the umbrella. Usually for a bridal shower I would use rose buds or some other smaller flower, but for this baby shower theme, these large bright daisies worked perfectly!
Monday, December 31, 2012
Monday, October 22, 2012
Halloween Happenings
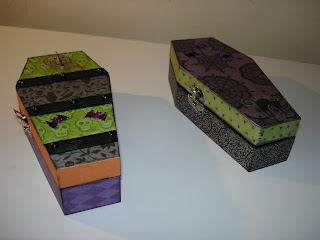
To decorate them I started by painting them with acrylic paint (I used black-green). This hides any minor gaps in the paper. Once the paint dried I covered the outside with a variety of papers by Martha Stewart Crafts and K and Company. Cut around the hinges and the clasp.
I also papered the inside of the lid and inside bottom of the box, but left the side on the inside natural wood. Once that was complete I inked all the edges with black ink. Each box was finished off with a clear coat of acrylic spray.
The boxes dried overnight and I embellished them the next day. Want to Scrap black pearls were used on the slats of some of the coffins. Stickers from Recollections and Jolee's completed the boxes inside and out.
These boxes were so much fun to make! I completed all six in one afternoon except for the final embellishments.
 |
| Finished coffins |
 |
| Black pearls and rhinestone bat embellishments |
Wednesday, October 3, 2012
Inside Hogwarts
Driving to Florida to visit
Disney World and Universal was the highlight of our 2011 summer. The Wizarding World of Harry Potter had just
opened that spring and so of course the kids couldn't wait to go there. After a 90 minute wait we were in!. But they had told us to put everything into
lockers at the beginning so that we wouldn't lose anything on the ride. That meant I had no camera! So after we toured the castle, my daughter
Jenny and I got back on line (yes another 90 minutes) so that I could take
pictures. (I kept my camera strapped to me during the ride this time). Now I had so many photos of inside Hogwarts I couldn't decide which ones to use. A
little booklet on my scrapbook page solved that problem .
 |
| Mini album on the pages adds room for extra photos. |
 |
| Original Loopy Brads |
I don’t how many of you are
like me, but there are times that I feel like I collect scrapbook supplies
rather than actually scrapbook. I have
more stock than I can use. The problem
with that is that some things I loved 4 or 5 years ago aren't items that I
want to use now. So I always try to find ways to incorporate
some of my older supplies onto my new layouts.
In this case I used a few of my Karen Foster loopy brads. I really do like these brads, but I never
seem to have a layout where they work.
The color was wrong for this layout, but I was able to change that. A little alcohol ink gave them the coppery
look I wanted to match other brads on the page.
These loopy brads are creating the doorknobs on my page.
 |
| Brads are adapted to the color scheme by coating them with alcohol ink |
Happy scrapping!
Sunday, September 16, 2012
Heritage Photos
My latest project is scrapbooking family photos. I have spent the summer scanning over 300 old
photos from the Ryan side of the family.
Now I would like to get them into scrapbooks before I forget who the
people are! Some of the photos are
already labeled unknown. There are so
many fabulous paper collections to scrapbook heritage photos I have a hard time
choosing. I am starting with one of my
favorites Bo Bunny.
I’m using the Timepiece line and adapting a layout I saw at Scrapbooks Plus. This layout is from my uncle's Confirmation in 1940. The last photo is one of my favorites because it has my father peeking out the doorway and getting into the picture!
I used the same paper to make the epoxy
embellishments and the flowers. All of the flowers
were cut using the Art Philosophy Cricut/ Close
to My Heart cartridge. Kathy is my
sister's and my favorite Close to My Heart consultant and she is the one who
taught us how to make the beautiful flowers. When they are cut out the flowers look like a flat spiral. then you roll then and glue then together as you go.
 | ||
| These flowers were inked first and then a pearl was added to the center. |
 |
Other embellishments include these adorable chipboard keys from the"Color Me Crazy" line by Petaloo. I used Glimmer Mist to add the color and the metallic look to them. A little off white lace on the top and bottom of the pages added the old time look.
Tuesday, September 4, 2012
Acrylic Soccer album
I do love acrylic albums.
They are so versatile! You can
stamp on them, paint on them and really take advantage of double sided
paper. I found this wonderful acrylic
soccer album a few years ago. It was
perfect for an album showing my son’s soccer photos from when he was just
learning through his high school soccer years.
The original album had six acrylic pages in it, so I inserted a
chipboard page in between every two acrylic pages.
To the right is one of the chipboard pages. I used Glimmer Mist over soccer ball mask cut on a Cricut.
Tuesday, August 28, 2012
OK - So I guess that I am going to give this blogging thing a shot. I have been scrapbooking for a few years and always love to see what everyone else is creating. Now my babies are off at college so I plan to spend more time scrapbooking and posting.
Some of my favorite lines of paper are Bo Bunny, My Minds Eye, and Best Creation. Lately I have been trying some acrylic albums and mini albums. Photos will be posted soon.
Subscribe to:
Comments (Atom)


